f

Thursday, July 31, 2014

Thrifty Thursday and OOTD

I had a very busy day today, so this post is coming just under the line for Thursday, at least in America.
Up first is the OOTD, my Hot Patterns Summer Breeze dress. I went with my yellow heels and a purse I made a while back for Fabulous Free Pattern Friday.
Here's a better picture of the bag. If you missed the post, it's actually made out of  a placemat. You can find the post here, http://rhondabuss.blogspot.com/2012/06/fabulous-free-pattern-friday.html
 An easy bag made from a placemat.
 I'm really enjoying the dress. Just perfect for summer.
Now for the Thrifty Thursday part of the day. Have you heard of Tina Givens? She has a lovely line of patterns that have been designed for linen or soft cottons. She has a number of free patterns.
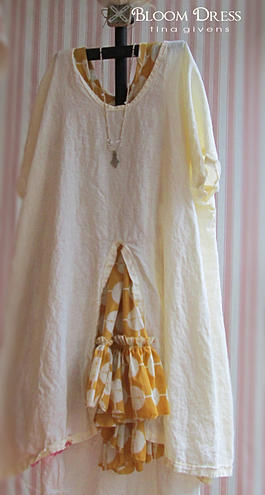
Her patterns are soft, romantic and especially easy to wear. Above is the Kika Dress and the Bloom Dress, both free patterns. Below is the Plinka pant, also free.

                                                  
I decided to give the Plinka pant pattern a try for a number of reasons. First of all, sometimes I just want to be comfortable and pull something on that is truly effortless. I also wanted to try out the fit of the pant. They are very loose fitting. This is a pattern that anyone can make and not have issues with the fit as long as you don't mind a loose fit.
A shot of me playing around with my husband :)
I made mine out of a crinkle cotton and I also lined them with a cotton batiste as the white crinkle cotton was just a little too sheer on its own. The pattern goes together quickly and the pants are even easier to make. Of course you could leave the ruffle off the bottom if you like.
In my crazy shot above, you can see that I only pleated up 1 side of the hem. The pattern actually tells you to pleat up the hem in 4 places.
So, a loose fitting pant that is super easy to make and has no fitting issues. You can find the Tina Givens website here along with all of her patterns.
Have fun!


Share this PostPin ThisShare on TumblrShare on Google PlusEmail This

Me Made Mondays Part 2

Just a quick post. I was asked to post a few extra pictures of the dress I was wearing in yesterday's post, so here goes....
I did not arrange the front drape as nicely as I do when I wear it, but I think you can you can get the idea. I also don't have the rock hard body of my dressform ;)  
The dress has a center front seam
The center front seam is not a straight seam. As you can see, it angles out which is what allows it to wrap.
There is an opening in the side seam for the left tie to go through.
 It has dolman sleeves and I tie it in the back
The bag is upholstered with embossed leather. I did this bag quite some time ago and it is truly one of my favorites.
The front piece actually keeps the bag closed. I was one lucky duck when the 2 magnetic closures matched!!
 The bottom of the bag with the feet.
So that's my quick little dog and pony show for today.
I will be doing a tutorial on how to do the hat I was wearing. I initially thought that I would need to buy a new straw hat, but then I realized that I have one that could use a little freshening up.
I just need to find some fabric to use for the brim.
Thrifty Thursday will happen a little later today. I have a rather fun little item to show you. So, I'll see you later this afternoon. Have a wonderful day!


Share this PostPin ThisShare on TumblrShare on Google PlusEmail This

Wednesday, July 30, 2014

Me Made Mondays at Frabjous Couture

Have you seen the new series that Marina of Frabjous Couture is doing? Rather than committing to an entire month of Me Mades, she has designated Monday, every day of the year as her Me Made day. And, what's even nicer is that she is inviting all of us to join her.  This week she posted this lovely sheath dress. Absolutely beautiful.
I participated in Me Made May two years ago and learned so much about myself and my wardrobe. I thought about participating again this year, but felt it was just adding one too many things to my plate. So when Marina posted that she would be hosting Me Made Mondays, without hesitation, I told her that I'm in!
This past Monday, I had a funeral to attend which explains the basically all black outfit. The dress is my design. I also made my accessories, not the necklace or the shoes. The hat is quite easy to do, just purchase a straw hat, cut off the brim and make a new brim. I can do a tutorial is anyone is interested.                      
    
The bag is one of my favorites. It's leather that has been upholstered.

If you've felt that an entire month of Me Mades is a little too much to do, give Marina's challenge a try and see how you do. I think you'll find it fun and rewarding and you may even learn a little something about your wardrobe.


Share this PostPin ThisShare on TumblrShare on Google PlusEmail This

Tuesday, July 29, 2014

Finishing Up the Fascinator/Part 5

The final step in finishing the fascinator is to finish the inside of the cap. 
I simply cut a piece of my fabric, pinned it in place and hand stitched it to the edge. When adding the lining, be sure to not pull it tight as we want to retain the cupped shape of the cap. This will allow it to sit comfortably on the head.
The lining has been stitched down.
The fascinator will not magically stay on the head, so we need to add a way to hold it in place. For a piece like this, I like to use elastic button loops. They can be found in the notions or the bridal area of your fabric store. Be sure to get the loops that are elastic. They come in black, white and ivory.
I run a small bead of Fabri-Tac around the edge and then attach the loops. Once the loops are in place, I then stitch them down along the outside edge.
It's a little difficult to see in the picture below, but the loops are stitched down and there is a stitch inside each loop. This is important because we don't want the loops to lift up once the comb is inserted.
To insert the comb, have the rounded side up and then push the loops over the teeth.
Push the loops to the edge of the comb and flip it over. This comb is just on the edge of being a little too large for this piece, but once it is in the hair, the edges should not be visible. If the comb hung over the edges a little more, I would have cut it in half and sanded the edges. The other loops will be used with bobbie pins. Just slide a bobbie pin into the hair and catch the loop. The fascinator will sit nicely on the head without any fear of it falling off.
When you last saw the fascinator, it looked like this.
It now looks like this.
 I had these feathers. They came on a stem, also from the floral department.
From the side.
The feather pieces were just nestled into the ribbon and around the flowers. I rather like the addition of the extra feathers.
So that's it, not at all difficult. My best advice is to just have fun and enjoy the process.
I won't be wearing this until October, but I'll see about getting a few pictures of it on my head before then. I'm sure you would like to see what it looks like on a real head and not a stuffed one!!! I think you'll be surprised by how it seems to just become a part of the hair and not appear as over the top as it does on the millinery head.
I hope you've enjoyed the posts.


Share this PostPin ThisShare on TumblrShare on Google PlusEmail This

The New Issue of Sew News and a Give Away!!

Have you seen the new issue of Sew News? Can you hear the excitement in my voice?!!!!!! Well, maybe you can't hear me, although I have been accused of being able to scream loud enough to be heard in another state ;)
I just received the new issue last week and it is full of all sorts of lovely projects, like the sweet, sweet apron below, and yes there is a free downloadable pattern that you can find here, http://www.sewnews.com/articles/2-Free-Apron-Patterns?bc=c There are actually 2 free apron patterns offered. 
And what about this tote?!!! Now who would believe that you made this??? Great zipper detail! And yes, there is a free pattern offered for this tote too. You can find it here, http://www.sewnews.com/articles/Roomy-Denim-Tote-Bag-With-Free-Patterns?bc=c
And now for my bit of excitement....my article on the upcoming Colette Clover Slim Pant Sew Along!!!
I liked the pattern so much that I actually made 2 pairs for the article. The pair in the above picture are made out of a wool and lycra blend and the pair below are just perfect for summer as the fabric is a lovely cotton and lycra blend.
The sew along will start September 2nd. If you would like to join along, you can find the pattern here, https://www.colettepatterns.com/sewing/clover

Sew News has very generously given me an extra copy of the magazine to pass along to one lucky person, so if you would like a chance to win a copy, leave a message on this post. I will announce the winner next Tuesday, August 5, 2014.  


Share this PostPin ThisShare on TumblrShare on Google PlusEmail This

Sunday, July 27, 2014

Sunday Night Reflections

Emerald River — Rio Verde, Texas. Gorgeous, this is the stuff my dreams are made of

No Man ever steps in the same river twice,
for it's not the same river,
and he is not the same man.
                 
                                                                                                             Heraclitus


Share this PostPin ThisShare on TumblrShare on Google PlusEmail This

Just Right Sweet

On this warm summer day, I thought I would give you another little trip to my grandmother's kitchen. When it came to sweets, she had a set repertoire, banana bread, the best muffins that were made with cream of wheat and her oatmeal cookies. She loved sweets, but she didn't want them to be too sweet. Come mid-afternoon, she would make the two of us a cup of tea and we would sit down and enjoy it with a couple of oatmeal cookies. The cookies are not the soft, gooey sweet cookies that we have become more accustomed to, they are much more of a tea cookie, rather crunchy and perfect for dunking.  

Elvera's Oatmeal Cookies

Ingredients
1/2 cup of butter
1 cup of sugar
2 eggs
4 tablespoons of buttermilk
1 teaspoon of baking soda
2 cups of flour
2 cups of oatmeal
1 teaspoon of cinnamon
1/2 teaspoon of ground cloves
1 cup of raisins
1 cup of chopped pecans

Cream butter and sugar. Add eggs one at a time and beat well between each.
Whisk soda into buttermilk. This is very important. A bit of a chemical reaction will happen between the baking soda and the buttermilk that will aide in the baking of the cookies.
Add flour 1/2 cup at a time.
Stir in oats, raisins, chopped pecans, spices and mix well.
Line cookie sheets with parchment paper. Drop on cookie sheet by the teaspoonful.
Bake at 325 degrees for 15 to 20 minutes until golden brown.

As I made up the cookies today, I thought about the addition of cloves. It is a little unusual for oatmeal cookies, but a taste I love. As I thought about it, I remembered that her purse always smelled of cloves as she loved Clove Chewing Gum.
                 
Her house always had the loveliest smell. When she died, I inherited a set of bedroom furniture. Under each drawer I found cloves and realized that this was her secret to a sweet smelling home.
If you enjoy a crunchy cookie that's not to sweet, I think you'll enjoy my grandmother's oatmeal cookies. If you are a runner or a cyclist, they are a great take along pick me up treat as they travel very well.
Enjoy!
Rhonda


Share this PostPin ThisShare on TumblrShare on Google PlusEmail This

Saturday, July 26, 2014

Building a Fascinator/Part 4

My fascinator is just about finished and I am really quite pleased with it. Below, it's sitting on my milliner's head form. This is a view from the front.
 From the back.
 And from the side.
 To try and get a better idea of the colors, I took the piece outside for a few shots.


As I said in the first post, the pieces just all seem to come together. Once I have pieces chosen, I play around with placement until I say, "oh, I really like that." I played around with the flowers and finally got that, "oh I really like that" moment when one of the flowers was somewhat hanging off the edge of the cap.     
Pieces like this are all about layering. A lot can go into a very small space. Once the first flower was glued on, I took my ribbon and and looped it around leaving a small space of the cap open. Once I liked the placement of the ribbon, I tacked it in place by hand. Just a few tacks here and there was all that it needed.  
Next, I placed the other 2 flowers on the cap, nestling them into the ribbon. Once I was happy with the placement of the flowers, I used hot glue to secure them in place.
I made 3 bunches of feathers wrapping a piece of wire around them. Once they were secure, I cut the ends off so that they were even.
I played around with the feathers and decided to hang one from either side and I placed 1 in the middle. All were nestled into the ribbon and then glued in place with hot glue.
Take a look at the picture above and you will see some branch type crystal and wire pieces laying on top of the feathers that are on either side of the cap. Below is an up close picture. Once the fascinator is in the hair, the feathers can get lost, so the small crystals catch light and add interest.  The branches are very easy to make and are just a little more complicated form of the wired crystals that I showed you how to do in this post.
Begin with a long piece of wire. Fold it in half  and twist it for about an 1 1/2". To form the small loop, I used a toothpick. Take a piece of the wire and repeat to one side. Continue down the length of the wire. Once the piece is finished, glue on the crystals just as we did in this post.  
I'm very pleased with the look of the fascinator.  
All that is left do is line the bottom of the cap and add loops and a comb so that it can be secured to the head. I will show you how to finish the fascinator on Monday. 
Hope you're having a wonderful weekend!
Rhonda 


Share this PostPin ThisShare on TumblrShare on Google PlusEmail This